The magic of photography isn’t just about owning the latest camera or lens—it’s about how you frame the world in front of you. Composition is one of the important beginner’s photography tips. Composition is the invisible structure that transforms ordinary shots into works of art. Whether you’re capturing a mountain peak in northern Pakistan, a bustling street in Dubai, or a simple portrait at home, learning photography composition rules will help you create photos that tell compelling stories.
In this blog, we’ll explore some timeless photography composition techniques that every beginner should know in 2025, along with practical tips on how to use them in travel, portrait, and everyday photography.
Why Composition Matters in Photography
Think of composition as the language of photography. Just as good writing relies on grammar and structure, great photography relies on composition to guide the viewer’s eye. Following composition rules doesn’t restrict creativity—it gives you a foundation to experiment and build your unique style.
When applied correctly, composition techniques can add depth, balance, and drama to your images, making them more engaging and memorable.
1. Rule of Thirds
The Rule of Thirds is one of the most fundamental principles in photography composition, and it’s often the very first technique introduced to beginners — simply because it works almost every time. The idea is to divide your frame into nine equal sections using two vertical and two horizontal lines, much like a tic-tac-toe grid. This grid gives you four points of intersection and several guiding lines that can help you place your subject in a visually pleasing way.
When a subject is positioned along these lines or at their intersections (often called “power points”), the image feels more natural, balanced, and engaging compared to placing everything right in the center. This technique guides the viewer’s eye through the frame and creates a sense of harmony without making the composition feel static or flat.
For landscapes: Instead of placing the horizon directly in the middle of your frame, align it with either the top third (to emphasize the foreground/land) or the bottom third (to highlight the sky). This simple shift creates depth and interest.
For portraits: Positioning the subject’s eyes along the top horizontal line instantly draws the viewer’s attention and makes the face the natural focal point of the image.
For wildlife and action shots: Leaving negative space in the direction where the subject is looking or moving adds flow and storytelling to the picture.
Example:
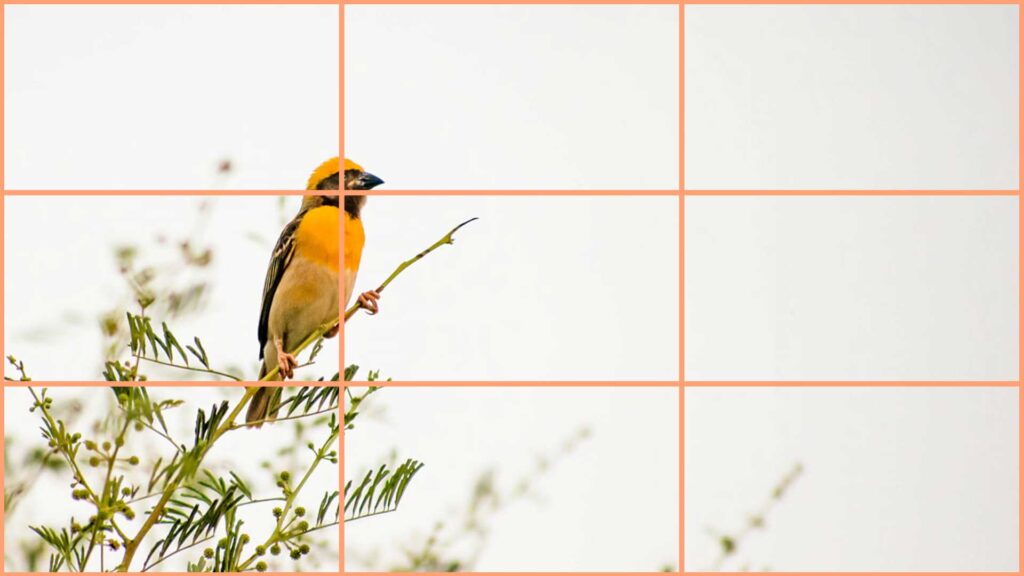
In the following image of the small yellow bird perched on a branch, the Rule of Thirds has been applied beautifully. Instead of placing the bird in the center of the frame, it is positioned along the left vertical line, with its head and eye falling very close to one of the intersection points. This placement naturally pulls the viewer’s eye to the bird while leaving plenty of negative space on the right side of the frame.
2. Leading Lines
Leading lines are one of the most powerful tools in photography composition because they naturally guide the viewer’s eyes through an image. These lines don’t just exist in roads or fences — they can be found anywhere: in rivers, rail tracks, architectural structures, or even shadows cast by light. By carefully positioning your subject where these lines converge, you create a sense of depth and direction that instantly draws attention to the focal point of your photo.
When traveling, always look for natural or man-made pathways that can act as guides for the eye. For example:
In historical architecture, staircases, arches, and corridors often frame the subject beautifully.
In urban landscapes like Dubai’s skyscrapers, bridges, and highways create dramatic leading perspectives.
In nature photography, rivers, tree lines, or trails can subtly lead the gaze into the heart of the image.
Example:
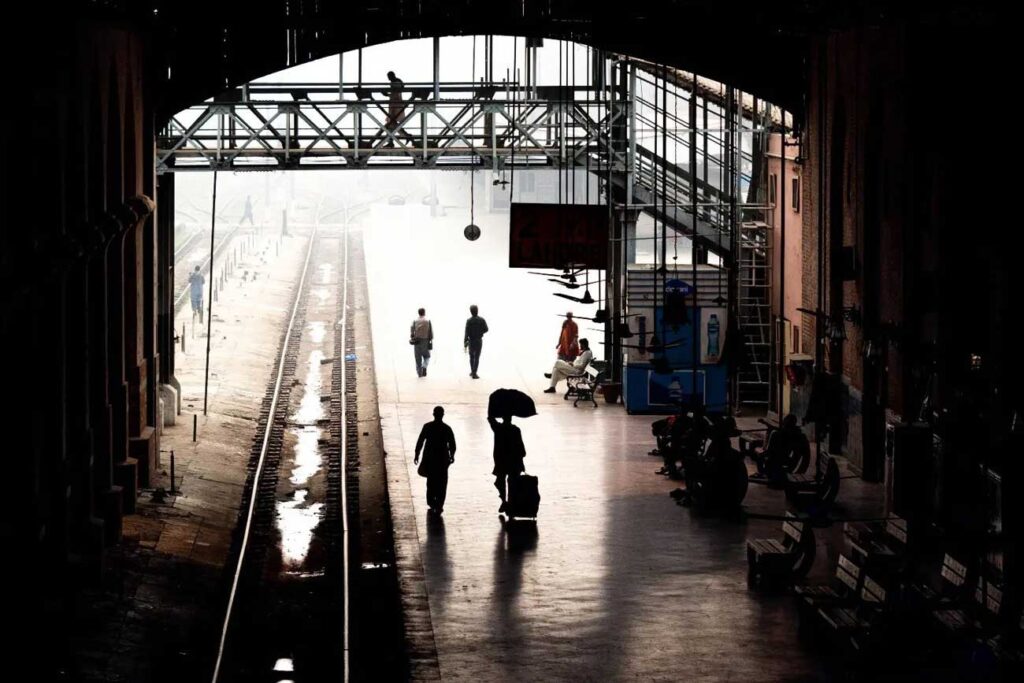
In the following striking image of a railway station, the concept of leading lines is used brilliantly. The train tracks on the left side of the frame create strong lines that pull the viewer’s gaze straight into the distance, toward the foggy, glowing background. On the platform, the shadows and the pathway act as secondary leading lines, guiding the eye to the people walking forward.
3. Symmetry and Patterns
As humans, our eyes are naturally drawn to balance, repetition, and rhythm in what we see. That’s why symmetry and patterns have such a strong impact in photography. Symmetry brings a sense of harmony, calmness, and order, while patterns can make an image visually striking and even hypnotic.
Using this rule doesn’t mean every photo must be perfectly balanced. Sometimes the beauty lies in highlighting a repeating design, and other times it’s in deliberately breaking the pattern to emphasize your subject.
Here are some creative ways to use symmetry and patterns in photography:
Reflections in water can mirror landscapes, creating perfectly symmetrical compositions.
Architecture often offers repeating patterns in tiles, arches, staircases, or windows that can make excellent subjects.
Nature is full of patterns — from tree rows and flower petals to waves and sand dunes.
Breaking the pattern by introducing a subject (like a person, bird, or object) into a repetitive scene can create a powerful focal point that immediately attracts the eye.
Example:
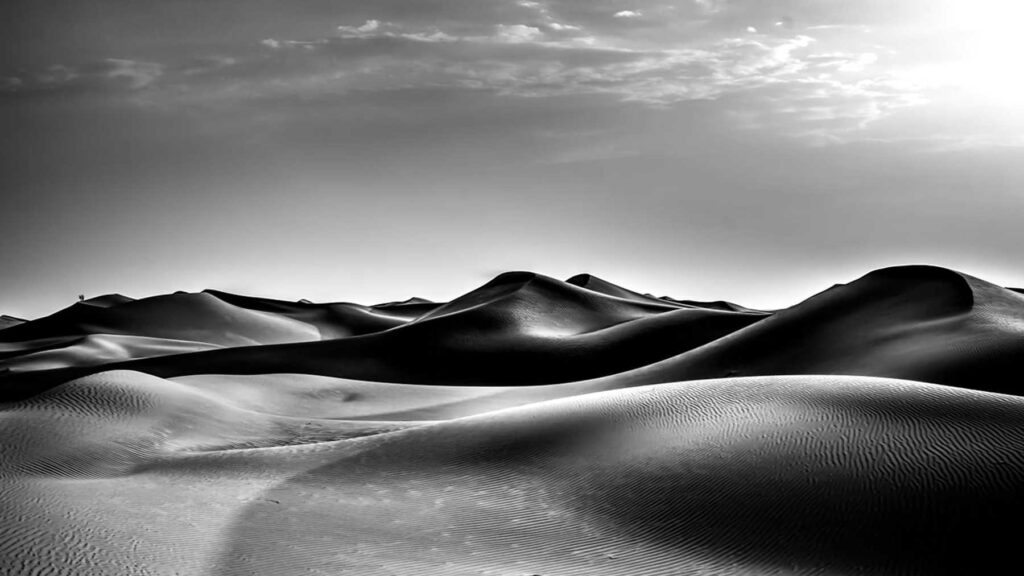
The following photograph of the desert dunes is a stunning example of using patterns and symmetry in nature. Notice how the curved lines of the dunes repeat across the frame, creating a natural rhythm that draws the viewer deeper into the scene. The repeating shapes and textures of the sand form an almost hypnotic pattern, enhanced by the play of light and shadow.
Even though the dunes are not perfectly symmetrical, the balance between light and dark areas, along with the repetition of smooth wave-like shapes, creates a sense of calm and order. The subtle textures in the sand add another layer of detail, making the composition both simple and dramatic.
4. Framing Within a Frame
One of the most creative ways to add depth and storytelling to your photos is by using the technique of framing within a frame. The idea is simple: use elements within your scene — whether natural or man-made — to act as a frame around your subject. This draws attention directly to the focal point while also adding layers of context and dimension.
Doorways, windows, arches, bridges, tree branches, and even shadows can work beautifully as frames. They don’t just highlight the subject; they also provide perspective, helping viewers feel like they are looking through something into another world. This makes the image more immersive and engaging.
Example:
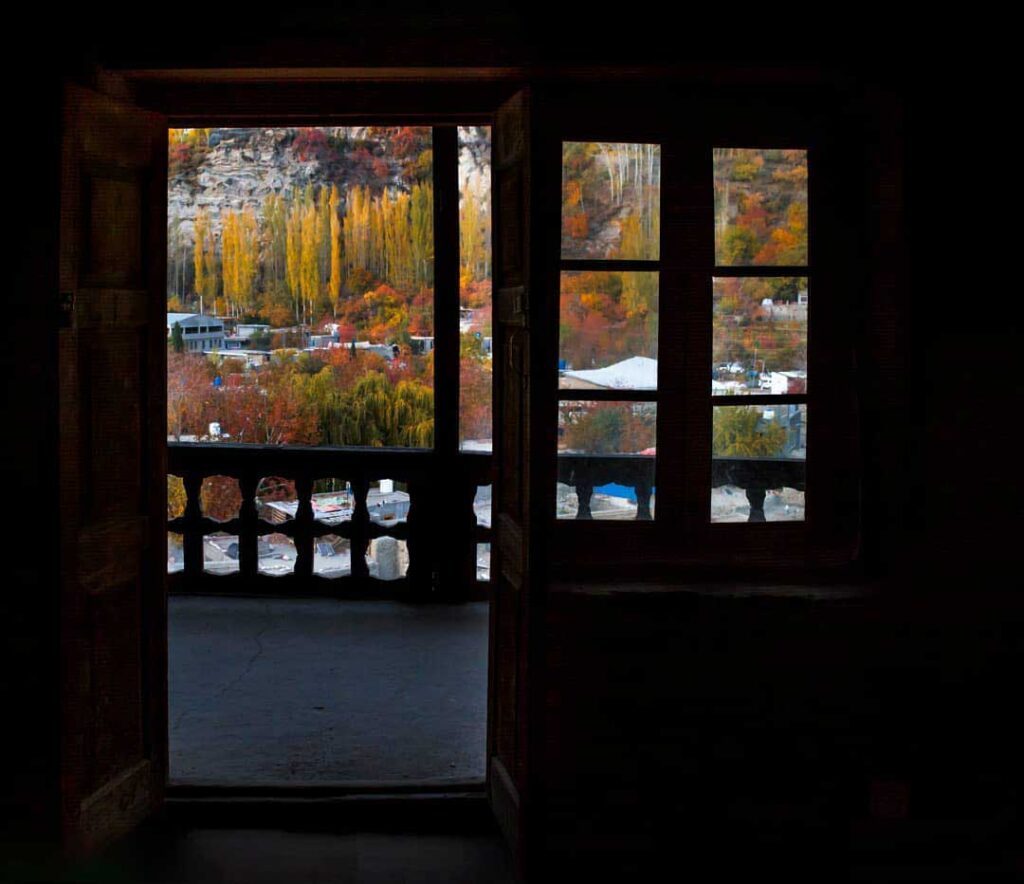
In the following photo of Hunza’s autumn, the open doorway and window are used as a natural frame to showcase the vibrant autumn landscape outside. The dark, shadowy interior contrasts with the bright colors of the trees, mountains, and houses, making the outside scene appear like a painting hanging within a wooden frame.
The wooden door and window grid not only guide the viewer’s eyes toward the autumn scenery but also add context — hinting that this view is from within a traditional house, perhaps in a mountain village. This clever use of framing transforms a simple view into a layered composition that feels intimate and artistic.
5. Depth and Layers
One of the key challenges in photography is that the camera naturally flattens a three-dimensional world into a two-dimensional image. If not composed carefully, photos can feel flat and lifeless. The solution lies in creating depth by adding layers — foreground, middle ground, and background — so the viewer feels drawn into the scene.
By carefully arranging these elements, you can give your photograph a sense of scale, perspective, and immersion.
In landscape photography, include rocks, flowers, or branches in the foreground to lead the viewer’s eye toward the horizon.
In portrait photography, use a shallow depth of field (wide aperture) to blur the background, making the subject pop while still suggesting depth.
In street or travel shots, placing people or objects at different distances helps build natural layers and storytelling.
Example:
This following image of a boat at sunset is a beautiful demonstration of how depth and layers can transform a simple scene into something captivating. Instead of feeling flat, the photo pulls the viewer’s eyes naturally from the front of the frame to the far horizon.
Foreground: The rippling water at the bottom of the frame serves as the first layer. The shimmering reflections of the orange and purple sky add texture and immediately engage the viewer.
Middle Ground: The boat is perfectly positioned as the main subject. It anchors the composition and provides a strong focal point, giving the viewer something to connect with.
Background: The glowing sun sets over the horizon, filling the sky with warm hues and completing the depth of the scene. The faint silhouettes of distant boats and land enhance the sense of distance.
By arranging these three layers — water, boat, and sunset horizon — the photographer creates a natural flow of depth. The viewer feels drawn into the image, almost as if they are sitting on the shore, watching the day fade away.

6. Negative Space
In photography, sometimes less truly is more. Negative space refers to the empty or unoccupied areas surrounding your subject in a frame. Instead of filling the image with multiple elements, this technique embraces simplicity, allowing the subject to stand out with more power and clarity.
Negative space creates a feeling of calm, balance, and minimalism. It gives the eye room to rest and helps the viewer focus on what really matters in the scene. This approach is especially effective in storytelling, as the emptiness around the subject can add mood — loneliness, freedom, peace, or even mystery.
Common examples include a single bird in the sky, a lone tree against a wide blue horizon, or a person walking along a deserted beach. The emptiness surrounding the subject becomes just as important as the subject itself.
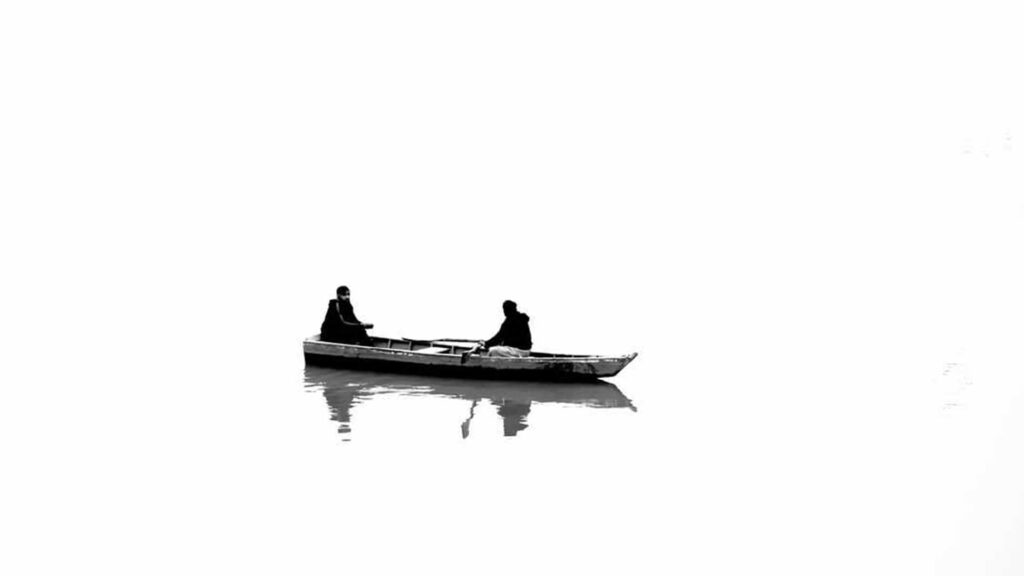
Example:
The following photograph of the two figures in a boat perfectly illustrates the power of negative space. The boat and its passengers are small, simple elements in the middle of an otherwise vast, empty white space. That emptiness — the water blending seamlessly with the background — acts as the negative space, isolating the boat and drawing the viewer’s full attention to it.
Instead of clutter, the composition embraces minimalism. The reflections of the figures add just enough texture to break the stillness, while the surrounding emptiness conveys solitude and quietness. The photo feels calm yet powerful, proving how negative space can transform a very ordinary subject into an extraordinary, thought-provoking image.
7. Golden Ratio (Fibonacci Spiral)
For photographers who want to go beyond the simplicity of the Rule of Thirds, the Golden Ratio — also known as the Fibonacci Spiral — offers a more advanced composition technique. Rooted in mathematics, the Golden Ratio is a natural proportion (approximately 1.618:1) that has been used for centuries in art, architecture, and design to create balance and beauty.
In photography, the spiral guides the viewer’s eye naturally through the frame, starting from the tighter curve and flowing outward toward the rest of the image. Unlike the rigid grid of the Rule of Thirds, the Golden Ratio creates a more organic and fluid path for the eye, which can make your compositions feel elegant and harmonious.
Although it may sound complex, applying it has become much easier. Many cameras and post-processing tools (like Lightroom or Photoshop) offer Golden Spiral overlays, making it simpler to align subjects and leading elements according to this principle.
Example:
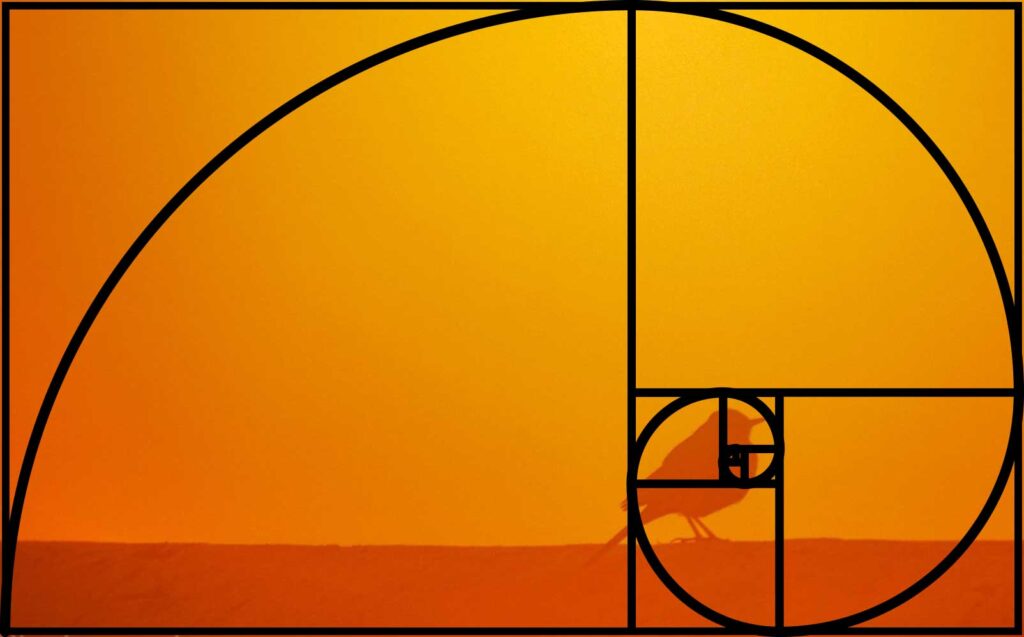
In the photograph following, the bird is placed at the smallest, tightest point of the Fibonacci Spiral, where the eye naturally begins its journey. From there, the viewer’s gaze follows the curve of the spiral outward, moving across the soft orange sky and eventually resting on the wider frame.
This placement doesn’t just highlight the bird as the main subject — it also creates a sense of flow and balance throughout the entire image. The warm gradient of the sunset sky enhances the composition further, making the photo both mathematically precise and artistically pleasing.
8. Fill the Frame
One of the simplest yet most effective composition techniques is filling the frame. By moving closer to your subject or zooming in, you eliminate unnecessary distractions and ensure that all attention stays exactly where you want it. This technique creates intimacy, draws focus to details, and adds emotional weight to your photos.
In portraits, filling the frame captures subtle expressions, textures, and emotions that might be lost in a wider shot. In travel or street photography, it highlights details — such as the wrinkles of an elder’s face, the texture of fabrics, or the craftsmanship of cultural artifacts — that tell deeper stories. The absence of clutter in the background allows the subject to take center stage, leaving a stronger impact on the viewer.
Example:
The following portrait of the elderly man is a striking example of filling the frame. By tightly framing his face, turban, and hand gesture, the photo brings out incredible detail — the wrinkles that mark his years, the texture of his white beard, and even the character in his glasses and weathered hand.
There are no distractions around him; the focus is entirely on his expression and posture. The viewer feels almost face-to-face with the man, drawn into his story and presence. This intimacy is exactly what “fill the frame” aims to achieve — capturing not just an image, but a feeling.

9. Rule of Odds
In photography, the Rule of Odds suggests that an odd number of subjects in a frame is often more visually appealing than an even number. Our brains naturally find odd groups more dynamic and engaging, while even numbers tend to feel too balanced or static.
For example, instead of photographing two people together, adding a third subject creates a triangle of interaction, which feels more complete. In still life or food photography, arranging objects like fruits, flowers, or cups in odd numbers (3, 5, 7) gives the composition balance and visual interest. Odd numbers prevent the eye from splitting the frame evenly and instead encourage movement and flow across the image.
Example:
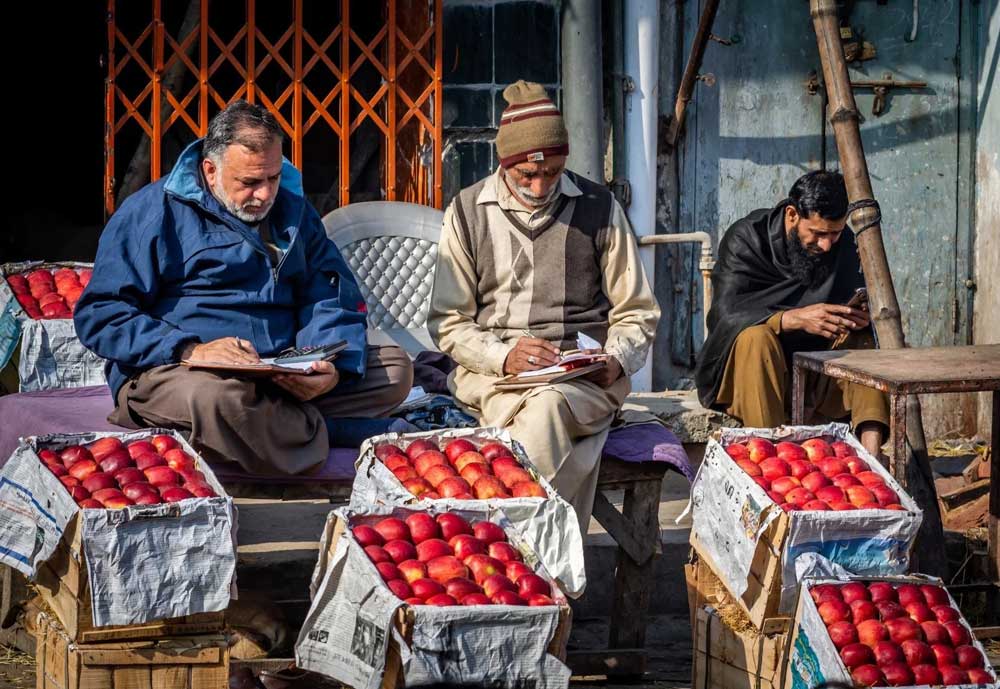
In the following photograph, the three men sitting among crates of apples perfectly illustrate the Rule of Odds. Their presence forms an odd grouping (three subjects), which makes the frame feel more dynamic and balanced.
The man on the left is busy with his notebook, slightly leaning forward.
The man in the middle becomes the strongest focal point, as he is placed centrally and is also writing.
The man on the right, a little detached and looking at his phone, adds variation that prevents the frame from feeling repetitive.
The rows of apple crates act as secondary elements, but because they’re arranged in multiple odd stacks, they too reinforce the rhythm of odds throughout the frame.
10. Break the Rules
Ironically, one of the most valuable lessons in photography is learning when and how to break the rules. Composition guidelines like the Rule of Thirds, Leading Lines, or the Golden Ratio are fantastic tools that give structure and balance to your images. But photography is also an art form, and art thrives on creativity, risk-taking, and personal expression.
Once you’ve practiced and understood these rules, don’t be afraid to bend or even ignore them to create something truly your own. For example:
Center your subject even though it defies the Rule of Thirds — this can create a bold, confrontational feel.
Tilt your camera to introduce dynamic tension or drama, instead of sticking to perfectly level horizons.
Fill the entire frame with patterns or textures, ignoring traditional negative space.
Play with motion blur, shadows, or silhouettes even if it hides details.
Breaking the rules is not about being careless; it’s about being intentional. It allows you to step away from predictable compositions and discover your unique photographic voice. Some of the most iconic photographs in history work precisely because the photographer chose to challenge conventions.
Practical Tips for Applying Composition Rules
- Practice one rule at a time until it becomes second nature.
- Study professional photographers’ work and observe how they apply these techniques.
- Don’t overthink—sometimes instinct leads to the best compositions.
Conclusion
Mastering these photography composition rules will elevate your work from snapshots to storytelling images. From the rule of thirds to leading lines, symmetry, and negative space, these techniques give structure to your creativity. Whether you’re exploring Pakistan’s northern landscapes, capturing travel photography in the UAE, or documenting everyday life, these rules will guide you toward more powerful images.
Photography is an art form that thrives on a balance between structure and creativity. Learn the rules, apply them, and then feel free to bend them to develop your unique perspective.